
When it comes to residential HVAC installation, understanding the process and preparing adequately can make a significant difference in ensuring comfort and energy efficiency in your home. Whether you’re replacing an outdated system or installing a new one, this comprehensive guide covers all the basics.
Why Invest in a Quality HVAC System?
- Enhanced Comfort: Modern HVAC systems provide precise temperature control and even distribution of airflow across your home.
- Energy Efficiency: Newer units are designed with advanced technology to minimize energy consumption, which can reduce utility bills significantly.
- Improved Air Quality: Many residential systems now incorporate air purifiers or filters that reduce the presence of allergens, dust, and other pollutants indoors.
- Increased Home Value: An efficient and well-installed HVAC system can enhance your property’s marketability and overall value.
Types of Residential HVAC Systems
| Type | Description | Best For |
| Central Air Conditioning | Provides cooling through ductwork using refrigerant-based systems | Homes with existing ductwork |
| Ductless Mini-Split | Offers zone-specific heating/cooling without ducts; wall-mounted units | Smaller homes or areas without ductwork |
| Heat Pumps | Dual-purpose for heating and cooling; highly energy-efficient | Areas with moderate climates |
| Furnaces | Primarily used for heating; powered by gas, electricity, or oil | Cold climates requiring robust heat output |
Discussing these options with an experienced contractor will help determine the best fit for your home.
Key Considerations Before Installation
- Sizing Matters: Proper sizing of an HVAC unit is crucial. Undersized systems may struggle to maintain temperature control, while oversized ones waste energy.
- Ductwork Inspection: Existing ductwork should be examined for leaks or damage to avoid inefficiencies once the new system is operational.
- Home Energy Assessment: A professional energy audit can identify areas where insulation or sealing improvements might enhance overall performance.
- Budget Planning: Factor in both upfront costs (equipment + labor) and potential long-term savings from reduced utility bills.
How to Choose the Right Contractor
- Licensing and certifications (e.g., NATE-certified technicians).
- Positive customer reviews or referrals from trusted sources.
- Transparent written estimates detailing labor charges, warranties, etc.
- Proven experience with similar projects (e.g., installations in homes like yours).
By investing time in research and careful planning beforehand, you’ll set yourself up for a smooth installation process while maximizing long-term benefits from your residential HVAC system.
Efficient Orlando HVAC Installation Process: Understanding Common Timeframes
When planning a residential HVAC system installation, understanding how long the process might take is essential. Several factors influence the timeline, and being informed can help homeowners prepare better. Below is an in-depth look at the common timeframes and key considerations to ensure a smooth and efficient installation process.
Key Factors That Impact AC Repair Orlando Installation Time
- Size of the Home: Larger homes typically require more extensive ductwork and larger systems, resulting in longer installation times. Smaller homes may take significantly less time.
- Type of System: Installing a central air conditioning system or a heat pump generally takes longer than installing ductless mini-split systems.
- Existing Infrastructure: If ductwork or wiring already exists and is in good condition, the process will be faster. New construction or major retrofitting requires more time.
- System Complexity: Advanced HVAC systems with high-efficiency components or zoning features often involve additional work and setup.
- Accessibility: Limited access to attics, basements, or tight crawl spaces may slow down the process for contractors.
Timeframes for HVAC Service Orlando and Installation
| Type of Installation | Approximate Time Required |
| Standard Central Air Conditioning | 1–2 days |
| Heat Pump Installation | 2–3 days |
| Ductless Mini-Split System | 1 day (per unit) |
| Full System Replacement with Ductwork Modifications | 3–5 days |
| New Construction (Complete Setup) | Up to 7 days |
Tips to Minimize Delays
- Choose an Experienced Contractor
Hiring licensed professionals reduces the likelihood of errors or delays during installation. - Prepare Your Home Ahead of Time
Clear out furniture or objects obstructing access to vents, ducts, or other areas where work will occur. - Inspect Existing Ductwork Early
If your home uses ducted systems, have them inspected beforehand. Any repairs needed should be addressed prior to installation day. - Discuss Timelines During Consultation
During consultations with contractors, ask about estimated timelines based on your home’s unique requirements. - Get Necessary Permits Ahead of Time
In some locations, permits are required for certain types of installations. Make sure these are secured before work begins.
Realistic Expectations About Timelines
While most installations fall within the outlined timeframes, complications may arise that extend the duration. Some potential issues include unforeseen damage to existing infrastructure (such as leaks in ductwork), supply chain delays affecting equipment availability, and extreme weather conditions if outdoor units are involved.
By understanding these common variables and preparing accordingly, homeowners can set realistic expectations around their HVAC project’s timeline while ensuring efficiency throughout the process. Always communicate openly with your contractor to address any concerns that arise during the job.
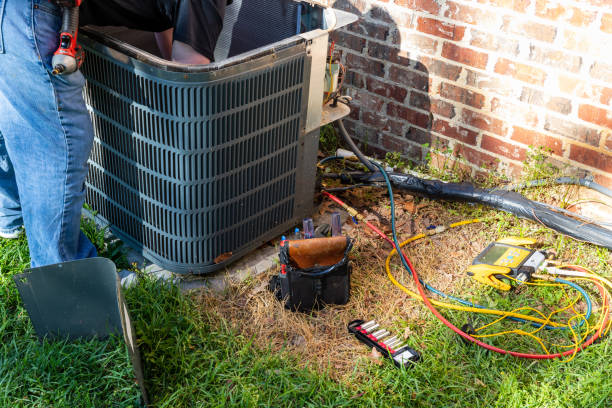
Expert Insights into Safely Removing Refrigerant and Old HVAC Systems
Properly removing refrigerant and dismantling an old HVAC system is a critical step in preparing for a new installation. This process requires technical expertise, adherence to environmental regulations, and the right tools to ensure safety and compliance. Below is an in-depth look at how this process works, along with expert tips for homeowners and contractors.
Importance of Safe Refrigerant Removal
Refrigerants are chemicals used in HVAC systems that facilitate the cooling process. However, they can be harmful to both humans and the environment if not handled correctly. Many refrigerants, particularly older ones like R-22 (Freon), are known contributors to ozone depletion. For this reason, the Environmental Protection Agency (EPA) has strict guidelines regarding their removal and disposal.
Key reasons why proper refrigerant removal is necessary:
– Compliance with laws: It’s illegal to release refrigerants into the atmosphere. The Clean Air Act mandates proper recovery processes.
– Environmental protection: Preventing leaks reduces harm to the ozone layer and mitigates greenhouse gas emissions.
– Personal safety: Direct exposure can cause skin irritation or breathing difficulties due to their chemical composition.
Steps for Safe Refrigerant Recovery
- Inspect the existing HVAC unit.
- Identify the type of refrigerant used (R-22 or newer alternatives like R-410A).
- Attach recovery machines designed specifically for extracting refrigerants without leaks.
- Connect hoses securely between the system’s service ports and recovery tank.
- Initiate recovery equipment as per manufacturer instructions.
- Monitor pressure gauges to ensure complete extraction from coils, compressors, and lines.
- Transfer recovered refrigerants into certified storage tanks.
- Work with licensed facilities for recycling or safe disposal.
Safely Dismantling Old HVAC Systems
- Disconnecting Power Supply: Always start by turning off power at the circuit breaker to avoid electrical hazards.
- Detach indoor air handler or furnace components first.
- Carefully remove outdoor condenser units next.
- Handling Electrical Wiring & Ductwork: Properly label wires during disconnection for easier reinstallation later.
- Disposal of Parts: Arrange recycling or disposal at authorized centers since many components contain metals that can be reused.
Tools Used During Removal
| Tool | Purpose | Safety Benefit |
| Refrigerant Recovery Unit | Extracts refrigerant safely | Prevents atmospheric release |
| Manifold Gauges | Monitors pressure during recovery | Ensures accurate extraction |
| Personal Protective Gear | Protects technician | Reduces risk from contact/exposure |
| Screwdrivers/Wrenches | Dismantles unit components | Facilitates controlled removal |
Tips for Homeowners
If you’re preparing your home for professional HVAC removal, consider these tips:
– Clear furniture or obstacles near indoor/outdoor units before technicians arrive.
– Ensure pets or children remain away from work areas during service hours. – Verify that your contractor holds EPA certification authorizing them to handle refrigerants legally and safely.
By following these guidelines and working with experienced HVAC professionals, you can ensure your old system is removed responsibly while minimizing risks to your home, health, and environment.
Preparing Your Home for a Seamless New HVAC System Installation
Proper preparation is essential to ensure a smooth and efficient HVAC system installation. By taking the time to ready your home, you can help reduce delays, avoid unexpected complications, and set the stage for optimal system performance. Below are key steps and considerations to prepare your home effectively.
1. Clear the Installation Area
- Outdoor Unit Space: Clear any debris, plants, or objects around where the outdoor condenser unit will be installed. Aim for at least 2–3 feet of open space on all sides to ensure proper airflow.
- Indoor Access: Identify spaces inside your home where air handlers, ductwork, or thermostats may be located. Remove furniture, decor items, or clutter that could block access.
- Attic/Basement Access: If the system requires work in these areas, ensure they are well-lit and free of excessive storage or obstacles.
2. Assess Your Electrical System
- Confirm that your home’s electrical panel has sufficient capacity for the new system.
- Consider consulting an electrician if you’re unsure whether upgrades to wiring or breakers may be required.
3. Seal Gaps and Insulate
- Inspect windows and doors for drafts and seal gaps with weatherstripping or caulk.
- Add insulation in attics, crawlspaces, or walls as needed to reduce heat transfer and lower overall energy consumption.
4. Discuss Ductwork Needs
- Have it inspected prior to installation to identify leaks or blockages.
- Schedule professional cleaning if ducts are dirty or clogged with dust and debris.
If ductwork needs repairs or modifications during installation, inform contractors ahead of time so they can plan accordingly.
5. Protect Your Home’s Surfaces
- Lay down protective coverings like drop cloths over floors near work areas.
- Use corner guards on doorframes or furniture edges near high traffic zones.
6. Communicate with Your Contractor
- Review timelines for each stage of installation.
- Confirm whether additional work (e.g., removal of old systems) is included in their scope of services.
Providing contractors with specific details about your home’s layout can also help prevent surprises.
| Preparation Task | Action Steps |
| Outdoor Unit Space | Clear debris/plants; maintain a minimum of 2–3 feet around unit |
| Indoor Access | Remove furniture; ensure clear pathways |
| Electrical System Assessment | Check capacity; consult an electrician if upgrades might be needed |
| Ductwork Inspection | Schedule inspection/cleaning; repair leaks if necessary |
| Surface Protection | Use drop cloths; protect corners/walls near work zones |
By addressing these preparation steps thoroughly before installation day arrives, homeowners can contribute significantly toward making the process as seamless as possible while paving the way for years of efficient HVAC performance in their homes.
Step-by-Step Process of New System Installation and Test Run
Installing a new HVAC system is a critical process that demands precision, planning, and technical expertise. A seamless installation not only ensures the efficiency and longevity of the system but also maximizes comfort for homeowners. Below is a step-by-step breakdown of how professionals approach new HVAC system installation and testing.
Step 1: Site Inspection and Preparation
Before any equipment is installed, the contractor will evaluate the site to ensure proper conditions for installation.
Key actions during this phase include:
– Inspecting existing ductwork: Ensuring ducts are clean, free of leaks, and properly sized for the new system.
– Assessing structural support: Checking if the attic or crawl space can adequately support the system components.
– Measuring airflow requirements: Determining appropriate airflow rates based on square footage and insulation levels of your home.
This step is vital to avoid issues like reduced efficiency or uneven heating/cooling.
Step 2: Selecting System Placement
The placement of major components (e.g., air handler, condenser unit) impacts both functionality and accessibility for maintenance. HVAC experts will:
– Choose a location with good air circulation for outdoor units.
– Ensure indoor units are installed in areas with minimal obstruction to airflow.
– Verify compliance with local building codes regarding clearances from walls, windows, or other structures.
Step 3: Installing New Equipment
| Component | Installation Tasks |
| Thermostat | Mounting it on a central interior wall for accurate readings. |
| Air Handler/Furnace | Securing it in place while connecting it to ductwork & electrical systems. |
| Condenser Unit (Outdoor) | Setting it on a stable pad outside and connecting refrigerant lines to prevent leakage. |
Every connection—whether electrical or mechanical—is carefully sealed to prevent energy wastage and ensure safe operation.
Step 4: Electrical & Refrigerant Connections
This phase ensures all power supplies are correctly linked while adhering to safety regulations. Tasks include:
– Connecting electrical wires between components following appropriate voltage ratings. – Charging refrigerant lines based on manufacturer specifications. – Testing for leaks in refrigerant lines using specialized gauges or sensors.
Proper calibration is crucial at this stage as low refrigerant levels can damage internal compressors over time.
Step 5: System Startup & Test Run
- Thermostat responsiveness when adjusting temperatures.
- Air distribution through all vents across rooms.
- Noise levels from fans/compressors during operation.
- Energy consumption data compared against benchmarks provided by manufacturers.
Technicians may also monitor humidity control features if your HVAC includes dehumidification capabilities.
Step 6: Homeowner Walkthrough & Maintenance Tips
Once satisfied with its operation, contractors guide homeowners through using their new HVAC system effectively by explaining: – How frequently filters should be replaced. – Recommended thermostat settings depending on seasonal changes. – Scheduling periodic professional inspections every six months or annually based on usage patterns.
Providing clear instructions at this stage ensures homeowners can maintain peak performance without unexpected breakdowns later down the line.
Through careful planning at each stage—from preparation through post-installation inspection—your new HVAC setup can offer years of consistent comfort while minimizing energy costs over time.
Finalizing the Install: Ensuring Quality with Follow-Up Inspections for Your HVAC System
After your new HVAC system has been installed and tested, the final step is to ensure that everything is functioning optimally through a comprehensive follow-up inspection. This crucial phase guarantees that your system operates efficiently, extends its lifespan, and avoids potential issues down the line. Below is a detailed guide on what to expect during this process and what homeowners should keep in mind.
The Importance of Follow-Up Inspections
Follow-up inspections are not just a formality; they are vital for several reasons:
– Efficiency Check: Ensures that your HVAC unit operates at peak performance without undue stress or energy wastage.
– Safety Assurance: Confirms there are no hazards, such as gas leaks, loose electrical connections, or improper ventilation.
– Compliance Verification: Checks that the installation complies with local building codes and manufacturer guidelines.
– Warranty Protection: Many warranties require professional inspections to remain valid.
Skipping this step could lead to complications down the road, costing more time and money.
What Happens During a Follow-Up Inspection?
- Measure airflow levels across ducts and vents.
- Check thermostat calibration for accurate temperature control.
- Evaluate heating and cooling output efficiency (BTU performance).
- Confirm proper refrigerant charge based on manufacturer specifications.
- Inspect for any leaks in refrigerant lines.
- Tighten all electrical connections.
- Test voltage levels across various components.
- Inspect circuit breakers and fuses for any abnormalities.
- Verify carbon monoxide detectors if gas-powered systems are used.
- Check safety shutoffs in case of malfunction or irregularities.
- Look for leaks in ductwork that could compromise efficiency.
- Ensure insulation around ducts minimizes energy loss.
- Noise Level Monitoring
Listen for unusual sounds during operation that might indicate mechanical issues.
Questions to Ask During Your Follow-Up Inspection
As a homeowner, it’s helpful to be proactive during this process by asking pertinent questions such as:
– Are there any recommendations for ongoing maintenance?
– What should I monitor between maintenance visits?
– How often should air filters be replaced?
Understanding these details can help you maximize the value of your new HVAC system over time.
Post-Inspection Checklist
Once your follow-up inspection is complete, use this checklist as a reference: | Task | Status | Notes | |——————————-|————-|—————————| | Thermostat calibrated | ✅ / ❌ | | | Refrigerant levels checked | ✅ / ❌ | | | Electrical connections secured| ✅ / ❌ | | | Safety measures verified | ✅ / ❌ | | | Ductwork inspected | ✅ / ❌ | |
Make sure your contractor provides documentation of all findings from their inspection.
Benefits of Regular Maintenance After Installation
While follow-up inspections focus on ensuring quality immediately after installation, regular maintenance is key to sustaining system performance long-term. Schedule periodic checks (at least twice annually) with your HVAC professional to address normal wear and tear or seasonal changes in operation.
Taking these steps ensures not only peace of mind but also cost savings through reduced utility bills and fewer unexpected repairs over time.
- Expert Tips for Choosing the Best Air Conditioner from an Orlando FL HVAC Company
- The Benefits of Choosing an Orlando FL HVAC Company for Repair and Replacement Services
- Your Comprehensive Guide to Choosing an Orlando FL HVAC Company for Residential Installation
- Finding the Best Orlando FL HVAC Company for Homeowners
- The Ultimate Step-by-Step Guide to AC Installation by an Orlando FL HVAC Company
- Understanding Orlando HVAC Systems: A Comprehensive Guide for New or Soon-To-Be Homeowners
- The Ultimate Homeowner’s Guide to Choosing the Best Orlando FL HVAC Company
- Understanding Orlando HVAC Services: What They Do and Why They’re Essential for Your Home